 .
.This new V7 feature will allow you to split one payment across multi-claims for that account.
1. From the “Main Menu” and select .
2. Select a “Consumer Debtor” by using any of our “Find by” options.
3. Once the “Consumer Debtor” pulls up, click on the  button.

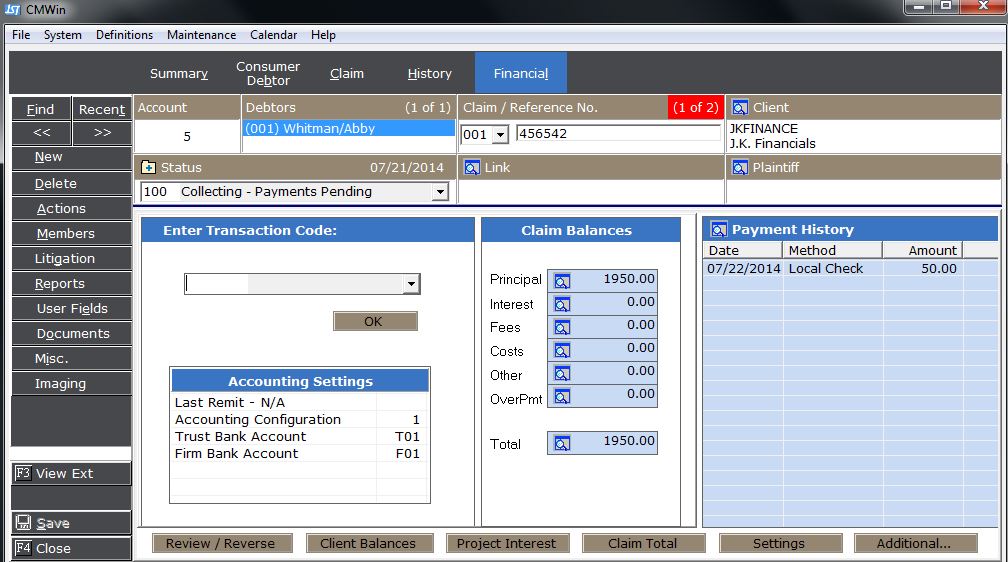
4. Enter the code “PMT” in the “Enter Transaction Code” section.

5. Click the  button.
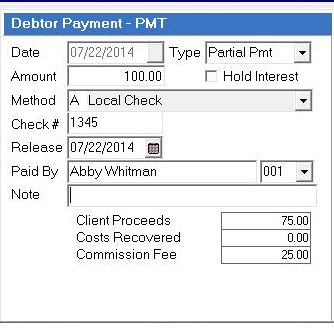
6. Enter the “Date”, “Type”, “Amount”, “Method”, “Check Number” if applicable, “Release Date”, and “Note”.
This new feature adds a  button to the payment screen. This feature will give you the option to take a single payment and apply it to multiple-claims on the same account.

Helpful Hints:
The button will only show up on accounts that have multiple claims.
If the payment overpays the first claim, the process will automatically roll the money on the subsequent claims. This distribution can be changed manually.
The  button override does not work with this feature. The “Payment Spreader” button will use the “Payment Allocation Settings” on the account to determine the order in which payments should be applied to the account.
The behavior for “Deleting” and “Reversing” a payment remains the same.
1. Enter all the payment information on the account and click the button.
2. The following pop-up window will appear:
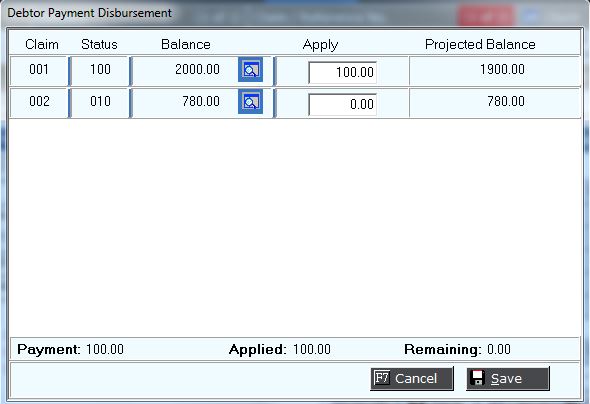
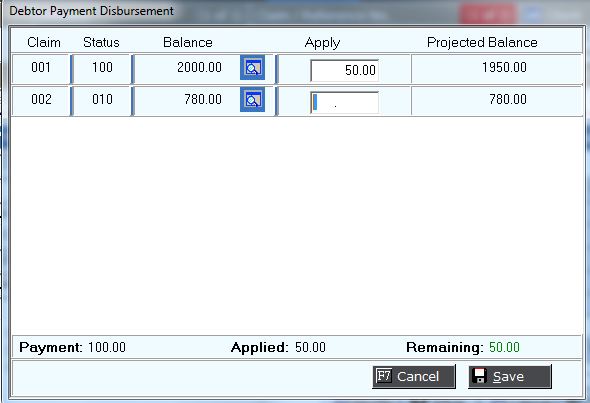
3. Once you remove the original payment amount from the “Apply” column. It will show you the “Remaining” amount on the bottom left. This will be the amount available to split among your accounts.
Helpful Hints:
Remaining Amounts displayed in green, will show what is available to split among your accounts.
Remaining Amounts displayed in red, will show how much you went over your original payment amount.
If you go over the amount recorded in the “Payment” section on the bottom right. It will require that you recalculate your payment splits.
In Version 10, an option to do a payment spread based on percentage of balance has been added. See ProRated Payment Spreader. For information on obtaining this feature, please contact our Sales Department.
4. After splitting your payment across the claims on the account the “Remaining” amount should be “0.00”.

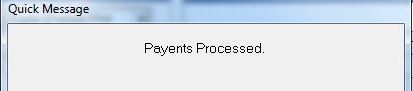
5. Click the  button to accept the payment split. You should see a quick pop-up message that shows “Payments Processed”.
6. At this point, your “PMT” transaction has posted to all the claims that you have
selected. The new balance has been updated on the claims.
Claim Number 1:
Claim Number2:

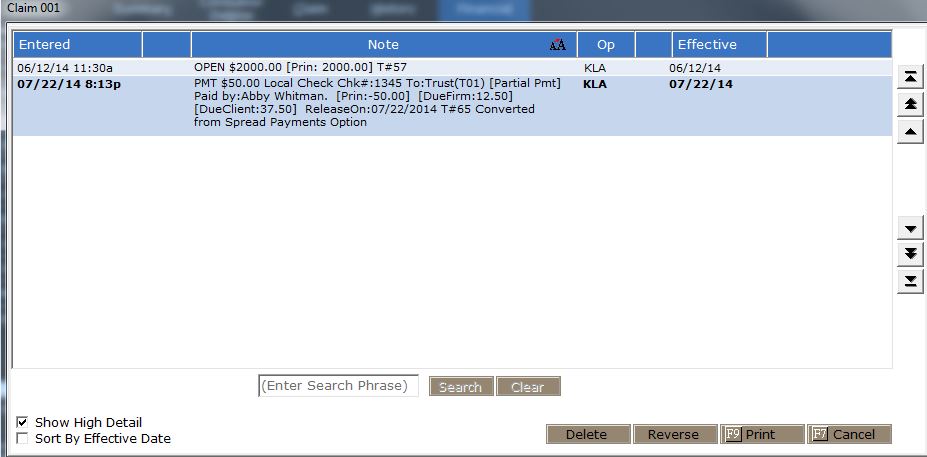
7. To check the “Consumer Debtor” history for the processed transactions, select the “Review/Reverse” button.
Claim Number 1:
Claim Number 2:

Helpful Hints:
If you need to verify if a payment was entered using the “Spread Payment” feature. All transactions entered in this fashion are marked with the following statement: ”Converted from Spread Payments Option”
8. Click the  , and it will return you to the “Consumer Debtor” Financial Screen.
9. Click the button and it will return you to the “Main Screen”.
1. From the “Main Menu”select the  button.
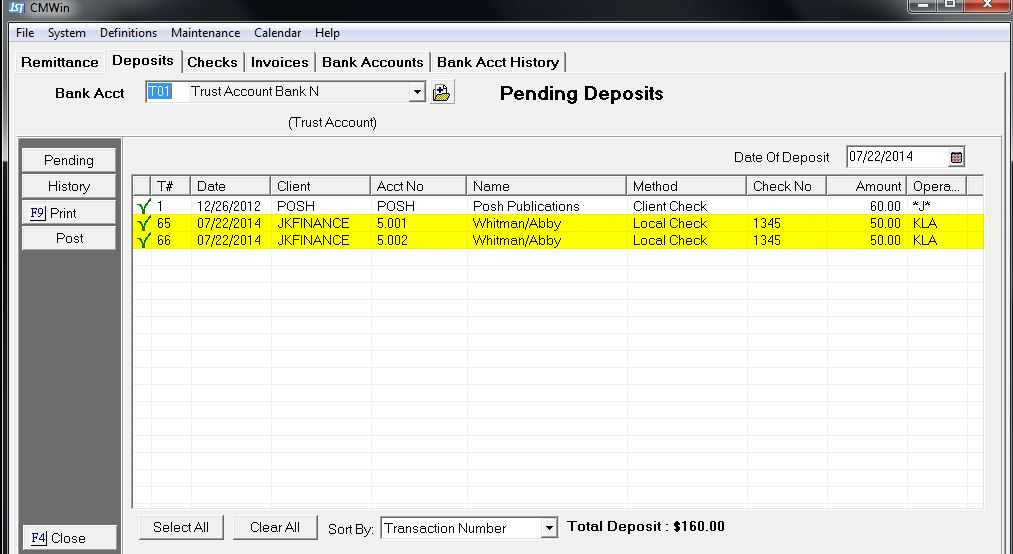
2. Select the  tab and use the drop-down and select the appropriate “Trust Account”.
3. The “Deposit” screen will pull up. The “PMT” transactions that was added using the “Payment Spread” are highlighted below. The transactions are listed as separate entries on your “Deposit Grid”.
4. Click the  button and it will return you to the “Main Screen”.
Helpful Hints:
All the features of the “Deposit Screen” work exactly the same. Any modifications or deleted payments are still done at the "Consumer Debtor" claim level.